

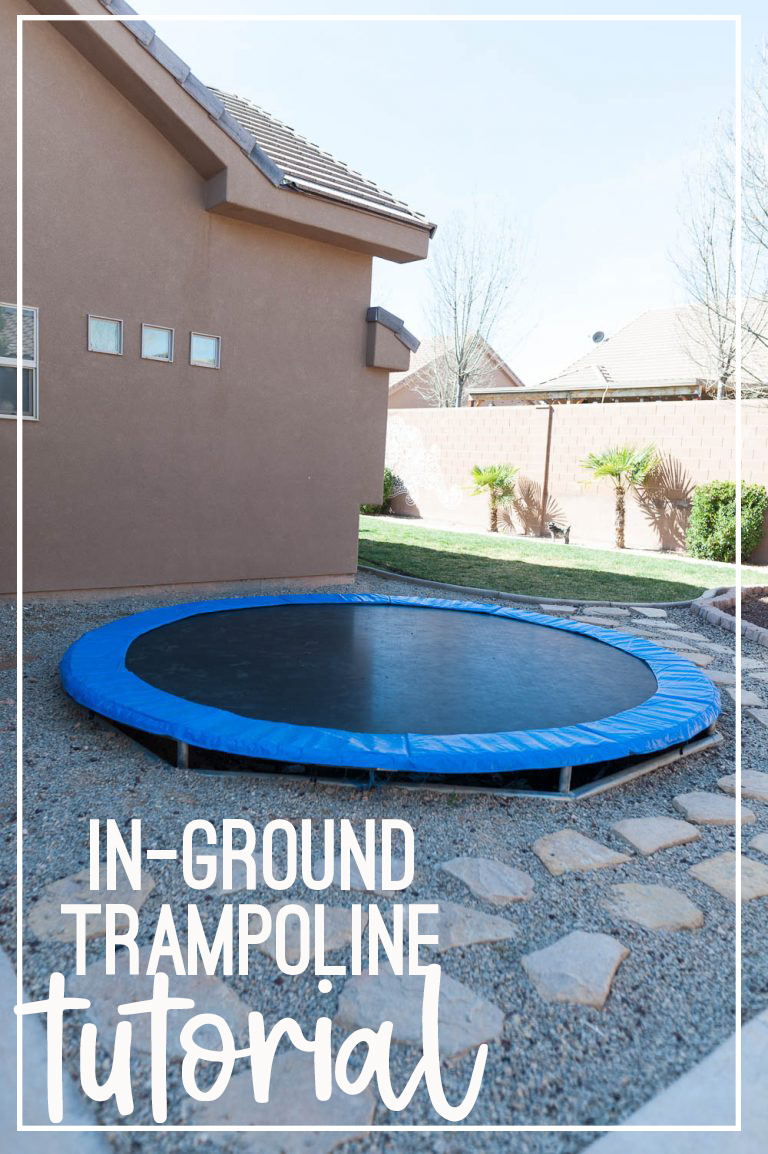
How To Install A Trampoline At Ground Level
Since we had a express budget on our backyard projection, my cute hubby, AKA Awesomeness,
 designed our inground trampoline plan. Dan had searched online for days. A good tutorial was no where to be institute. In fact, nosotros were both astounded to detect that the CHEAPEST DIY kit is more than $600.00 (and this didn't include the cost of digging the hole). Plus if yous have a professional person landscaper come and do the project, the price was around $1500.00. Um…no manner.
Dan conglomerated his own plan with tidbits gathered from several sources. A good friend Jeff Poulton let usa come and check out his design. Dan made a few modifications of his own, and off we went to purchase the supplies.
Supplies Listing:
Eight 2X4X12 of force per unit area treated wood
Iv 4X12 sheets of roofing sheet metal
1 ane/2 inch Self tapping screws
sixteen cinder blocks with u shape groove
Tools:
Shovel
Level
Tin can Snips
Hammer
Drill
Tamper (to help compact your dirt)
First things first, Footstep 1: Dig your hole. Nosotros had our landscaper include excavation the hole for our tramp in our landscaping. Our ground is FILLED with rocks. After attempting to dig holes in our backyard for trees, we knew that excavation an unabridged trampoline hole was out of the question. This toll approximately $150.00 to have the landscaper dig the hole and booty abroad nigh the clay.
Sidenote: You will need to salvage some of the clay for after. And so, don't get rid of all of your dirt.

The hole needs to be one foot larger than your trampoline'southward circumference. For example, if your trampoline is a 14 foot trampoline, you need a 15 human foot pigsty. Kapeesh!?
Advice: Make certain the frame fits into your hole before standing to the next step. We had to manually shovel the sides of our hole for several hours before ours would fit.

Next, level your trampoline. Your trampoline needs to be completely level in the ground. To accomplish this, we used cinder blocks with a U shaped groove in them for the trampoline legs to rest in.

We used four cinder blocks per trampoline leg. Dan was careful to level each section of the tramp past placing a long 2X4 across the top of the tramp with a level on information technology. This allowed us to make certain that the tramp was completely level when we finished the process. Each cinderblock was dug down and secured into place with the surrounding dirt.
Tip: When putting a trampoline in the ground, you need to leave enough room for the air to escape. We wanted our tramp to be iv inches off the basis to create a channel for the air to flow. Well-nigh of the tutorials nosotros read said to leave at least ii inches of leeway. Nosotros wanted our trampoline to accept equally much bounce as possible, so nosotros left it 4 inches above footing level. If yous do not practise this, your trampoline will lose bounce considering the air will take no where to escape.

Side by side, take the trampoline out of the hole. we took the trampoline frame out of the pigsty to begin construction on the environment structure.
Showtime, accept pressure-treated 2X4s and cut them on 22.five caste angles. Attach each 2X4 section to the leg of the trampoline department by using self tapping screws. Continue all the way effectually the trampoline.

Install a second layer of 2X4s it should be installed 12 to 16 inches beneath the top layer. The 2X4 frame is attached to the trampoline legs to help create a supportive barrier for the surrounding dirt in the ground.

Side by side, begin screwing your canvas metal to the 2X4 frame. Iv 12 foot lengths of canvass metal was used to environment the xiv foot trampoline. Each sheet overlapped the side by side canvass past about two feet. This prevents the demand to cut the sheet metal. Start on 1 side of the trampoline and bend the canvass metallic to fit deeply forth your 2X4 frame.

The peak of your sheets should be about 4 inches college than the 2X4. This allows plenty metal to fold over the height of your 2X4 and spiral it securely into place on the inner side of your frame. This prevents any sharp edges from sticking upwardly.

Here is a picture of how we did the corners of each leg. We used tin snips to cut a slit into the metallic and folded each side down and screwed it into place.


Adjacent, gather a few strong helpers to assist in placing your tramp dorsum into its hole. Make sure that each leg is back into the cinder block groove perfectly. Double check that your trampoline frame is level.

The final step of installing your inground trampoline system is to back make full and meaty your dirt on both the outside and within of your trampoline frame. This will prevent your dirt from caving into your trampoline hole. The outside dirt should be level with the footing. The dirt on the inside of your tramp should gradient toward the center of your trampoline. The dirt on the inside of the tramp needs to cover at least 1/3 of your sheet metal frame. The clay on the inside and outside helps your tramp to stay in place while you lot jump.

Sidenote: If your trampoline is in the center of your lawn surface area, you volition need to take extra precautions to ensure proper drainage in the bottom of your hole. Nosotros did not take to worry near this step because our sprinkler organisation does not affect the area where our trampoline sits.
It is SOOO much fun! The kids love it…then does my domestic dog Carbohydrate. 🙂

Total Toll:
$150.00 to have the landscaper dig the hole and haul the dirt plus $150.00 for the supplies =
$300!
If you missed our backyard reveal post, check it out HERE!
Update: ten/8/2012 I have had a lot of questions about water filling up in the pigsty for our trampoline. Nosotros haven't had any problems with this personally, but we specifically put the tramp in a location in our backyard that does non get hit by whatsoever sprinklers. We as well live in a dry climate that doesn't pelting a lot. But, nosotros take had a few instances that my husband accidentally left our hose running for hours and hours filling up our puddle adjacent to information technology which overflowed the pool and filled up the trampoline pigsty. This has happened iii times and the construction has stayed completely in tact. We did pump out the water with a water pump and hose inside a few hours though. I promise this answers the questions out there about water and our in-ground trampoline!
Published on May ten, 2022

Source: https://www.allthingsthrifty.com/diy-inground-trampoline-instructions/
Posted by: haughsureed.blogspot.com
0 Response to "How To Install A Trampoline At Ground Level"
Post a Comment